
Part Two: How to Reduce Variables in Fiber Reactive Dyeing
In the first post, we discussed preparation and color matching for the fabric. To continue the reactive dyeing process, equal focus must be placed on the dyeing procedure. The goal is to achieve level dyeings that are on shade and repeat from lot to lot. How do we ensure we reach these results?
Dye Bath Preparation
Many spots and unlevel dyeings occur from not having a good standard procedure. Any chemicals you plan to use should be checked for compatibility. Also, adding them to the make-up tank in pre-determined order. This testing will alert you of any inconsistencies prior to carrying out the full dye bath.
As you move towards the full dye bath, always dissolve the dye per the supplier’s recommendation. Pay special attention to the g/L ration of dye in make-up tank, the dissolving temperature, and dye time. You’ll also want to monitor the temperature at which the mix tank is dropped into dyeing machine.
Liquor Ratio
Why is the liquor ratio essential? Because reactive dyes will hydrolyze (react with water). Even though the newer dyes (like bi-functional, poly-functional, and hetero-functional) are not as sensitive as earlier dyes, they are still affected at a lesser degree. This can appear as either a variation in depth and/or the shade of the dyeing. Variation in lot size and/or machine type used in dying from lot to lot are the most common areas where this occurs.
Numerous first generation reactive dyes are still workhorse dyes. Examples are Reactive Black 5, Reactive Blue 19, Reactive Blue 21, and Reactive Blue 250. In higher liquor ratios, these dyes have a significant loss of depth.
If you are uncertain about the liquor ratio, check the salinity of the dye bath after the addition of an electrolyte with a salometer to determine salinity. By knowing the amount of electrolyte added to the dye bath, with a proper procedure and salinity chart, you can determine the actual liquor ratio of the individual machine. Every dyeing operation should have and use this valuable tool.
Alkali and Electrolyte (Salt) Concentration
As these are calculated in g/L, knowing the liquor ratio of the dye bath is essential. Having insufficient amounts of either will result in loss of dye yield (depth) and shade variation. Having excessive amounts of either can result in unlevel, blotchy dyeings and variation in depth.
The depth of a shade determines the amount of both alkali and salt to use. Most dye supplier’s technical data contains a chart that includes recommendations for each dye chemistry by total dye concentration in the formula. Typically there are 6 – 8 variations listed. These are guidelines proven to give the best results.
Here’s an example of a salinity chart from our Reactive Dye brochure, featuring our Sorafix products.
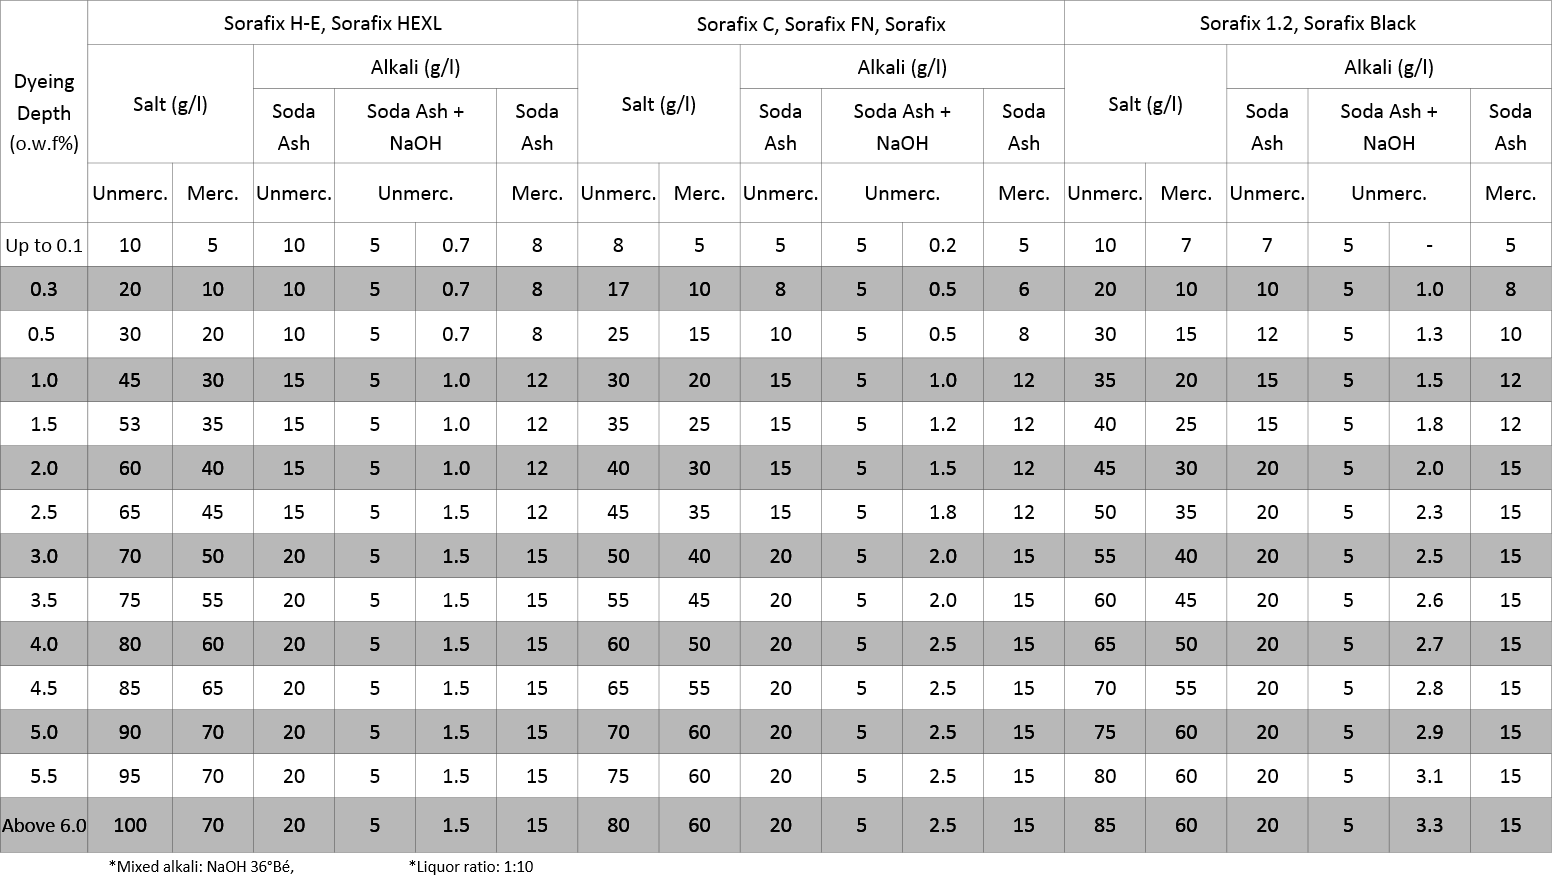
Like mentioned before, a salometer can be used to confirm salinity of dye bath. Checking pH after adding an alkali is useful in determining alkali concentration. But, this is only a guideline, as this does not show total alkalinity. Sufficient total alkalinity is required to achieve maximum dye yield. Soda Ash is the most commonly used alkali. Dissolve it in warm water before adding. When dyeing using a constant temperature procedure, the alkali addition must be dosed into the bath properly to insure level dyeings and good repeatability.
Dyeing Temperature and Time
As the name of reactive dyes imply, there is a chemical reaction during the process. Temperature and time with the alkali is the catalyst for the reaction. Thus, it also determines the success or failure of the dyeing. The requirements are determined by the chemistry of the reactive dyes being used. This information should also be in the technical data supplied by the dye supplier.
In most manufacturing facilities, there is constant pressure to increase productivity and reduce dye cycle time. Reducing the temperature and/or time can result in loss of yield (depth) and shade variation from lot to lot.
Troubleshooting Lot Sample Discrepancies
Most all problems with level dyeing and lot to lot repeatability occur in one or more of those areas. Yet, another issue that occurs is when the results of the mid-production lot sample and the final lot sample don’t align. The problem is usually found in the procedure the lab is following to carry out these tests. Without the right lab procedure, you won’t be able to duplicate the end results in the production batch. There are several areas you can look into when this occurs to improve your process:
What is the amount of time between sampling and approval?
This should be constant and as short as possible. A standard procedure for testing samples in the lab should be established.
Is the issue constant?
If this a constant issue with a particular shade, you should look into the dye combination and/or the dyeing process. Depending on what’s found here, you may want to adjust the combination or process, especially if a dye or dye in combination continues to build. A good example of this is the issues faced for years with Reactive Blue 21. They yellows combined in the blend reacted at a much higher rate while the Blue 21 continued to build.
As always, you can find other areas at fault for inconsistent dyeing. However, the items we discussed are where the majority of problems occur.
Stay tuned for the next blog, where we will discuss issues that tend to arise in rinsing, soaping, and drying. We’ll explore their possible causes and variables to monitor to prevent them from happening.
Missed the first post on reactive dyeing? Catch what you’ve missed.